Read: OS Cloud
In this section, we are going to build a “toy cloud” called OS Cloud. Similar to a real cloud (like aws), OS Cloud will allow us to create and manage virtual machines, through an http API.
Prerequisites
Make sure the following packages are installed:
sudo apt-get -y update; sudo apt-get -y install docker-compose jq
Also, make sure your user can run docker commands. If not, maybe you need to add it to the docker group:
sudo usermod -aG docker student
Then, after re-login:
student@os:~$ docker ps
CONTAINER ID   IMAGE     COMMAND   CREATED   STATUS    PORTS     NAMES
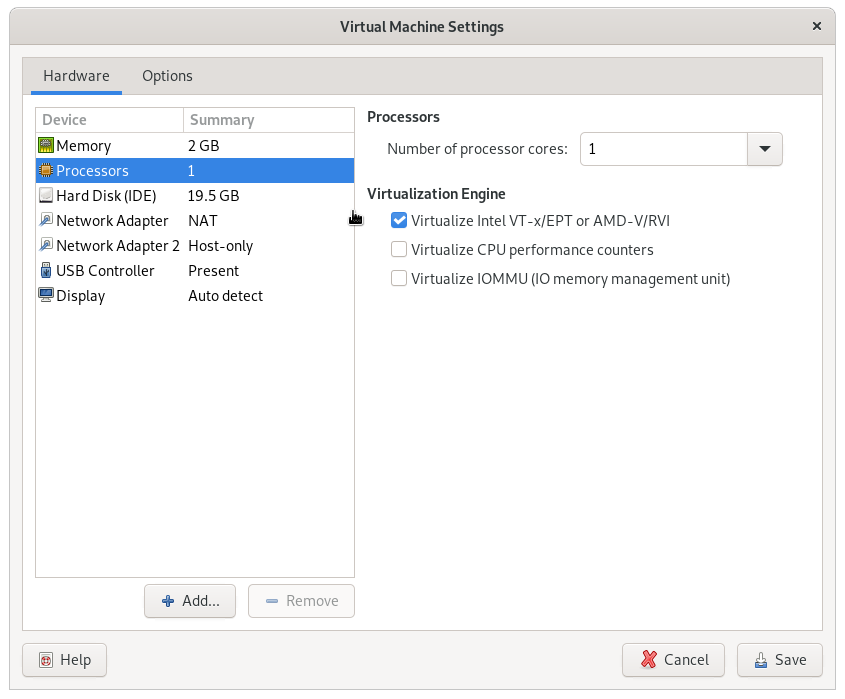
If you are running inside a virtual machine, you need to enable nested virtualization. Example for vmware:
For virtualbox:
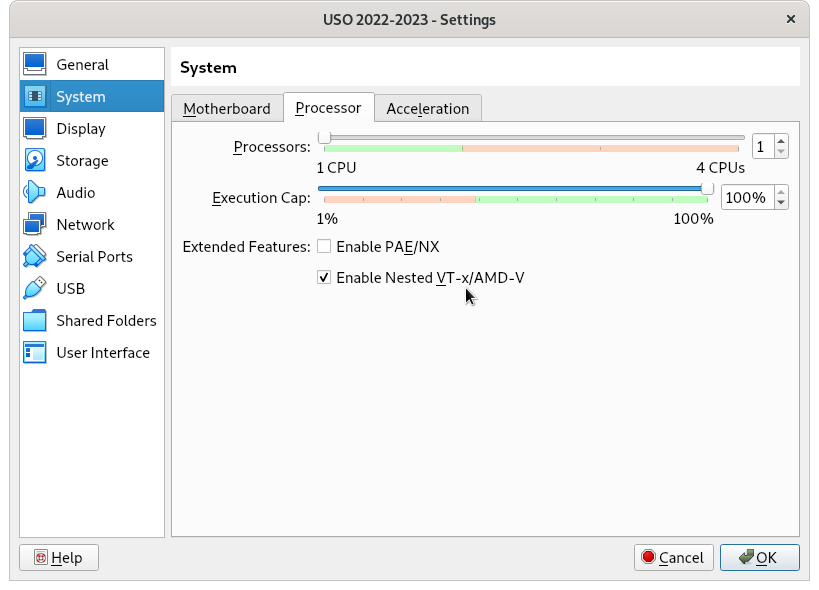
If the button is greyed out, try from the command line:
student@os:~$ VBoxManage  list vms
"USO 2022-2023" {042a5725-bfb7-4a46-9743-1164d3acac23}

student@os:~$ VBoxManage modifyvm {042a5725-bfb7-4a46-9743-1164d3acac23} --nested-hw-virt on
Initial Liftoff
First, we need to do some initial setup:
student@os:~/.../support/os-cloud$ ./initial_setup.sh
Then go to support/os-cloud and run:
student@os:~/.../support/os-cloud$ ./setup_db.sh
Setting up db
Starting db server
Waiting for db server to start
...
Stopping db server
Restarting db server
Waiting for db server to start
Creating tables
Stopping db server

student@os:~/.../support/os-cloud$ docker-compose up --build
Now the http API will listen on port localhost:5000. Let’s try:
student@os:~/.../support/os-cloud$ curl localhost:5000
Welcome to OS Cloud!
Let’s check the running virtual machines:
student@os:~/.../support/os-cloud$ curl localhost:5000/vm_list
[]
We got an empty list, since there are no virtual machines yet. Let’s create one (the command will take about 1 minute to complete):
student@os:~/.../support/os-cloud$ curl -H "Content-Type: application/json" \
 -d '{ "name": "my_vm", "image": "ubuntu_22.04", "network": "default", "mem_size": "2G", "disk_size": "10G"}' \
 localhost:5000/vm_create
{"id":1,"status":"ok"}
Check the virtual machine list again:
student@os:~/.../support/os-cloud$ curl localhost:5000/vm_list
[{"id":1,"name":"my_vm"}]
We can also use the jq tool to pretty print the json outputs:
student@os:~/.../support/os-cloud$ curl -s localhost:5000/vm_list | jq .
[
  {
    "id": 1,
    "name": "my_vm"
  }
]
We see our newly created virtual machine. Let’s get some information about it:
student@os:~/.../support/os-cloud$ curl -s -H "Content-Type: application/json" -d '{ "id": 1 }' localhost:5000/vm_info | jq .
{
  "disk_size": 10737418240,
  "id": 1,
  "ip": "192.168.0.2",
  "mem_size": 2147483648,
  "name": "my_vm",
  "network": "default",
  "os": "ubuntu_22.04",
  "state": "RUNNING"
}
We recognize some parameters that we specified at creation time, like mem_size and disk_size. Also, the IP address 192.168.0.2 has been allocated for our machine.
Virtual Machine Creation
Take a look at the vm_create function in support/os-cloud/os-cloud/vm.py. The steps undertaken are roughly:
-
some initial allocations: the virtual machine IP address, network interface, qemu ports, etc
-
the virtual machine disk is created, based on the template specified by the user (like
ubuntu_22.04) -
the virtual machine is started with this new disk, in order to do some more customizations (the
ubuntu_22_04_vm_preparefunction) -
the virtual machine is restarted again with the final disk in place
Disk Creation
All the disk templates are in labs/lab-12/tasks/os-cloud/support/disk-templates. This directory will be mounted in /disk-templates inside the container.
The first step of disk creation is to create a qcow2 disk file based on the template specified by the user (step 2 from the explanation above).
This is done in the create_disk_from_template function in labs/lab-12/tasks/os-cloud/support/os-cloud/disk.py. The function will first create a disk object in the database, then it will call 2 shell scripts: create_disk_from_template.sh and setup_root_password.sh.
The second step is to start the virtual machine with this disk and do some customizations (step 3 from above).
This is done in the ubuntu_22_04_vm_prepare function in labs/lab-12/tasks/os-cloud/support/os-cloud/vm.py. The code will connect to the vm’s qemu serial console using pexpect. Then it will use a series of expect_exact + sendline pairs to interact with the virtual machine, as if those commands were typed in the command-line.
OS-Cloud: More Disk Customization
You might have probably noticed that there are 2 types of disk customizations:
-
One type is for things that can be done without running the virtual machine. If we only want to modify some files inside the disk filesystem, we can do so by mounting the disk. This is done, for example, in the
disk-templates/ubuntu_22.04/setup_root_password.shscript. There we usenbd_connect_qcow2+mountto mount the disk, then we modify the/etc/shadowfile to change the root password. -
The second case is for operations that must be done with the virtual machine running. These are handled in the
ubuntu_22_04_vm_preparefunction: the virtual machine is first started (start_qemu_for_vm), thenpexpectis used to interact with the virtual machine via theqemuserial console. Here we do things like runningssh-keygen- a binary that is part of the disk filesystem, which depends on other parts of the operating system from the disk to be running. Note that inubuntu_22_04_vm_prepare, for convenience, we also do some customizations that fall into the first category (like modifying/etc/ssh/sshd_config).
Copy Additional Files to the Newly Created Disk
This is a customization from the first category. In disk-templates/ubuntu_22.04/files there is a file called 99-os-cloud-welcome (a script that prints a greeting message). We want to copy this file to /etc/update-motd.d in our newly created disk, so that it will run whenever a user logs in.
To do this, you will create a script called copy_files.sh in disk-templates/ubuntu_22.04. This script will receive a path to a qcow2 disk file as an argument, it will mount the disk, and then copy the file to the necessary location. Then, in the create_disk_from_template function in disk.py you will call this script, similar with how the other scripts are called.
You can use disk-templates/ubuntu_22.04/setup_root_password.sh as an example.
SSH Key Setup
We want to be able to log into the virtual machine using an ssh key, instead of the password 123456. Notice that the vm_create API also accepts an ssh_key parameter. Here, the user can provide an ssh public key, which the system will install in /root/.ssh/authorized_keys in the newly created virtual machine.
Your task is to implement this feature, as a customization from the second category (that is, implemented in the ubuntu_22_04_vm_prepare function). The key will be accessible to the function as the ssh_pub_key parameter. Then it’s only a matter of writing the key to the appropriate place, using a command like echo key > /root/.ssh/authorized_keys. Note that the /root/.ssh directory might not exist, so you need to create it as well.
After the feature is complete, you can test it using the keys in the support/os-cloud/keys directory. This directory contains a pair of public-private keys. The directory will also be mounted inside the os-cloud container in /keys.
You will create another virtual machine, passing the public key to vm_create:
student@os:~/.../support/os-cloud$ curl -H "Content-Type: application/json" \
 -d '{ "name": "my_vm2", "image": "ubuntu_22.04", "network": "default", "mem_size": "2G", "disk_size": "10G", "ssh_key": "ssh-rsa AAAAB3NzaC1yc2EAAAADAQABAAABAQC8CDHgeE4NIIIih3wSz58GDkfPLUk2m9gmbZB1f6o8Lzawzb3HVFpslAUWK0f/Ymw9cloInpMo50gWMYFSyJ7ZrOWWak54BedpHDkFAxxy+JCE9b+pkKsrAT7wiir7gn2LHlhj55FLZkC9PpM9cBcrMfzlcP9Bf+2cnpDdINybSLmOUmrI23ANteM4lEVaa2yEbCaJk6dFB8+atz5zPjvVI0Hd+kJK7yJ0xV6Zc2ADle7TKW3dyiXOE9qFKe9933Rj7ocqNXCAO1cxUoJCVuVS7lh+1pSSPXLWLTOhVp/XiLGWVP6KRYmmn710MWKm9Kj1tPiGUphUraL20SJiRT6/ os-cloud-user"}' \
 localhost:5000/vm_create
{"id":2,"status":"ok"}
Obtain the IP address that was allocated to the new vm:
student@os:~/.../support/os-cloud$ curl -s -H "Content-Type: application/json" -d '{ "id": 2 }' localhost:5000/vm_info | jq .
{
  "disk_size": 10737418240,
  "id": 2,
  "ip": "192.168.0.3",
  "mem_size": 2147483648,
  "name": "my_vm2",
  "network": "default",
  "os": "ubuntu_22.04",
  "state": "RUNNING"
}
Then go inside the os-cloud container and ssh to the vm using the private key in /keys. It should work without prompting for the password:
student@os:~/.../support/os-cloud$ docker-compose exec os-cloud bash
root@ac93d3d6cab2:/app# ssh -i /keys/ssh_key root@192.168.0.3
Welcome to Ubuntu 22.04.1 LTS (GNU/Linux 5.15.0-56-generic x86_64)
[...]
Powered by OS Cloud
Last login: Mon Jan  2 19:34:53 2023 from 192.168.0.1
root@ubuntu:~#
OS-Cloud: Internet Access
Notice that our virtual machines don’t have Internet access:
Powered by OS Cloud
Last login: Mon Jan  2 19:52:47 UTC 2023 on ttyS0
root@ubuntu:~# curl google.com
curl: (6) Could not resolve host: google.com
In this task, we want to fix this problem. To do this, we must first understand how the networking for the virtual machines is done.
First, there is the concept of a network, which you saw in the previous section. There is a network called default, with the address of 192.168.0.0/24. All virtual machines are part of this network, that’s why they were allocated ip addresses like 192.168.0.2.
Let’s go inside the os-cloud container and take a look at the network interfaces:
$ docker-compose exec os-cloud bash
root@8333e5cefb0d:/app# ip a
1: lo: <LOOPBACK,UP,LOWER_UP> mtu 65536 qdisc noqueue state UNKNOWN group default qlen 1000
    link/loopback 00:00:00:00:00:00 brd 00:00:00:00:00:00
    inet 127.0.0.1/8 scope host lo
       valid_lft forever preferred_lft forever
2: br0: <BROADCAST,MULTICAST,UP,LOWER_UP> mtu 1500 qdisc noqueue state UP group default qlen 1000
    link/ether 8a:68:b7:5b:6b:45 brd ff:ff:ff:ff:ff:ff
    inet 192.168.0.1/16 scope global br0
       valid_lft forever preferred_lft forever
3: tap0: <BROADCAST,MULTICAST,UP,LOWER_UP> mtu 1500 qdisc pfifo_fast master br0 state UP group default qlen 1000
    link/ether 8a:68:b7:5b:6b:45 brd ff:ff:ff:ff:ff:ff
4: tap1: <BROADCAST,MULTICAST,UP,LOWER_UP> mtu 1500 qdisc pfifo_fast master br0 state UP group default qlen 1000
    link/ether fa:f8:7f:83:50:8f brd ff:ff:ff:ff:ff:ff
77: eth0@if78: <BROADCAST,MULTICAST,UP,LOWER_UP> mtu 1500 qdisc noqueue state UP group default
    link/ether 02:42:ac:16:00:03 brd ff:ff:ff:ff:ff:ff link-netnsid 0
    inet 172.22.0.3/16 brd 172.22.255.255 scope global eth0
       valid_lft forever preferred_lft forever

root@8333e5cefb0d:/app# ps -ef | grep qemu
root          19       8 29 09:15 ?        00:01:26 qemu-system-x86_64 -m 2048 -hda /vm-disks/1/disk.qcow2 -net nic,macaddr=52:54:00:12:34:00 -net tap,ifname=tap0,script=no -monitor telnet::10001,server,nowait -serial telnet::10002,server,nowait -nographic -enable-kvm
root          29       8 28 09:15 ?        00:01:24 qemu-system-x86_64 -m 2048 -hda /vm-disks/2/disk.qcow2 -net nic,macaddr=52:54:00:12:34:01 -net tap,ifname=tap1,script=no -monitor telnet::10003,server,nowait -serial telnet::10004,server,nowait -nographic -enable-kvm
Here we have 2 virtual machines running. Each virtual machine uses a tap interface (the -net tap,ifname=tap0,script=no parameter for qemu). This means that the ens0 interface inside the virtual machine corresponds to the tap0 interface outside the virtual machine. All the tap interfaces are bridged together into the br0 bridge, which has the ip address 192.168.0.1. Also, each virtual machine has the default gateway configured to be 192.168.0.1.
In summary, it looks something like this:

All the traffic coming from the virtual machines passes through the br0 interface. So, in order to make the Internet work, all we have to do is a simple NAT, with a command like:
root@8333e5cefb0d:/app# iptables -t nat -A POSTROUTING -s 192.168.0.0/24 -j MASQUERADE
Now, the virtual machines should have Internet access:
root@8333e5cefb0d:/app# ssh root@192.168.0.2
[...]
root@ubuntu:~# curl google.com
<HTML><HEAD><meta http-equiv="content-type" content="text/html;charset=utf-8">
<TITLE>301 Moved</TITLE></HEAD><BODY>
<H1>301 Moved</H1>
The document has moved
<A HREF="http://www.google.com/">here</A>.
</BODY></HTML>
Now your task is to run the iptables command above automatically when the system starts, so that it’s not necessary to run it manually like we did in the above example.
A good place to do this is in the create_one_network function in network.py. There you can add another subprocess.run call to run iptables. The 192.168.0.0/24 value should not be hardcoded, but you can take it from the ip_with_prefixlen member of the Net object.
Task: Create a New Disk by Hand
Navigate to labs/lab-12/tasks/os-cloud/support. Let’s replicate the above-mentioned steps and create a new disk ourselves.
First, we have to call the 2 scripts from the create_disk_from_template function:
student@os:~/.../support$ ./disk-templates/ubuntu_22.04/create_disk_from_template.sh ./disk-templates/ubuntu_22.04/ubuntu_22.04.qcow2 my-disk.qcow2 10737418240
Image resized.

student@os:~/.../support$ ls -lh my-disk.qcow2
-rw-r--r-- 1 student student 619M Nov 20 15:41 my-disk.qcow2

student@os:~/.../support$ sudo ./disk-templates/ubuntu_22.04/setup_root_password.sh my-disk.qcow2 123456
Now we can start a qemu instance using this disk:
student@os:~/.../support$ qemu-system-x86_64 -enable-kvm -m 2G -hda my-disk.qcow2 -nographic
...
Ubuntu 22.04 LTS ubuntu ttyS0

ubuntu login: root
Password:
...
root@ubuntu:~#
Here we can further run customization commands, like the ones in the ubuntu_22_04_vm_prepare function, or any other things that we want.
When we’re done, we run the halt command:
root@ubuntu:~# halt
root@ubuntu:~#          Stopping Session 1 of User root...
[  OK  ] Removed slice /system/modprobe.
[  OK  ] Stopped target Graphical Interface.
...
         Starting System Halt...
[   86.431398] reboot: System halted
When the System halted message is printed, press CTRL+A X to exit qemu (that is, press CTRL+A, release CTRL and A, press X).
Task: Implement vm_stop
The vm_stop command will stop a particular virtual machine, meaning it will stop the qemu process for that vm. The implementation starts in api_vm_stop in app.py, which is the function that handles the http request for the stop operation. Here you need to do the following:
-
extract the virtual machine
idfrom the request -
use the
vm.vm_getfunction to convert this ID into aVMstructure -
call
vm.vm_stopand pass theVMobject to it
In vm.vm_stop:
-
call
stop_qemu_for_vm -
change the vm pid in the database to
-1 -
change the vm state in the database to
VM_STATE_STOPPED
After modifying the code, you should run docker-compose up --build again. Also, if your database became inconsistent, you can clean it up by re-running the setup_db.sh script. Then delete all vm disks with sudo rm -rf vm-disks/*.
With vm_stop implemented, the system should work like this:
student@os:~/.../support$ curl -s localhost:5000/vm_list | jq .
[
  {
    "id": 1,
    "name": "my_vm"
  }
]
student@os:~/.../support$ curl -H "Content-Type: application/json" -d '{ "id": 1}' localhost:5000/vm_scurl -s -H "Content-Type: application/json" -d '{ "id": 1 }' localhost:5000/vm_info | jq .
{
  "disk_size": 10737418240,
  "id": 1,
  "ip": "192.168.0.2",
  "mem_size": 2147483648,
  "name": "my_vm",
  "network": "default",
  "os": "ubuntu_22.04",
  "state": "RUNNING"
}
The vm is in the RUNNING state. Now let’s stop it:
student@os:~/.../support$ curl -H "Content-Type: application/json" -d '{ "id": 1}' localhost:5000/vm_stop
{"status":"ok"}
student@os:~/.../support$ curl -s -H "Content-Type: application/json" -d '{ "id": 1 }' localhost:5000/vm_info | jq .
{
  "disk_size": 10737418240,
  "id": 1,
  "ip": "192.168.0.2",
  "mem_size": 2147483648,
  "name": "my_vm",
  "network": "default",
  "os": "ubuntu_22.04",
  "state": "STOPPED"
}
Now the state is STOPPED. Inside the container, the qemu process should be gone as well:
student@os:~/.../support$ docker-compose exec os-cloud bash
root@b0600eff8903:/app# ps -ef
UID          PID    PPID  C STIME TTY          TIME CMD
root           1       0  0 10:00 ?        00:00:00 /sbin/docker-init -- python3 -u app.py
root           7       1  0 10:00 ?        00:00:00 python3 -u app.py
root          33       0  0 10:00 pts/3    00:00:00 bash
root          41      33  0 10:00 pts/3    00:00:00 ps -ef
Finally, the vm can be started again using vm_start:
student@os:~/.../support$ curl -H "Content-Type: application/json" -d '{ "id": 1}' localhost:5000/vm_start
{"status":"ok"}
If you’re having difficulties solving this exercise, go through this reading material.
More Implementation Details
The application consists of 2 containers:
-
db, which runs aMySQLdatabase -
os-cloud, which runs the web application and the virtual machines
Let’s check them. After running docker-compose up, in another terminal run docker-compose ps:
student@os:~/.../support/os-cloud$ docker-compose ps
       Name                      Command              State                    Ports
------------------------------------------------------------------------------------------------------
os-cloud_db_1         docker-entrypoint.sh mariadbd   Up      3306/tcp
os-cloud_os-cloud_1   python3 -u app.py               Up      0.0.0.0:5000->5000/tcp,:::5000->5000/tcp
Now let’s move inside the os-cloud container:
student@os:~/.../support/os-cloud$ docker-compose exec os-cloud bash
root@89a986d2526e:/app#
Since the virtual machines run inside this container, we should expect to see the one that we created in the previous step.
root@89a986d2526e:/app# ps -ef | cat
UID          PID    PPID  C STIME TTY          TIME CMD
root           1       0  0 09:02 ?        00:00:00 /sbin/docker-init -- python3 -u app.py
root           7       1  0 09:02 ?        00:00:00 python3 -u app.py
root          12       7  6 09:02 ?        00:00:41 qemu-system-x86_64 -enable-kvm -m 2048 -hda /vm-disks/1/disk.qcow2 -net nic,macaddr=52:54:00:12:34:00 -net tap,ifname=tap0,script=no -monitor telnet::10001,server,nowait -serial telnet::10002,server,nowait -nographic
root          27       0  0 09:11 pts/3    00:00:00 bash
root          35      27  0 09:13 pts/3    00:00:00 ps -ef
Indeed, a qemu-system-x86_64 process is there. The vm should be accessible via ssh on the IP 192.168.0.2 with password 123456 (if you get connection refused here, you need to wait a bit more for the machine to boot):
root@adf6e0bf4e6e:/app# ssh root@192.168.0.2
The authenticity of host '192.168.0.2 (192.168.0.2)' can't be established.
ED25519 key fingerprint is SHA256:3Mfa1fB9y4knUDJWEmEOTz9dWOE7SVhnH/kCBJ15Y0E.
This key is not known by any other names
Are you sure you want to continue connecting (yes/no/[fingerprint])? yes
Warning: Permanently added '192.168.0.2' (ED25519) to the list of known hosts.
root@192.168.0.2's password:
Welcome to Ubuntu 22.04 LTS (GNU/Linux 5.15.0-40-generic x86_64)

...

Last login: Thu Nov 17 07:49:55 2022
root@ubuntu:~#
The vm is also accessible on the serial console (notice the -serial telnet::10002,server,nowait argument to qemu). If we start a telnet connection on port 10002, qemu will show us the virtual machine’s serial console (basically the output that we normally see when running a virtual machine in text mode)
root@adf6e0bf4e6e:/app# telnet localhost 10002
Trying 127.0.0.1...
Connected to localhost.
Escape character is '^]'.

ubuntu login: root
Password:
Welcome to Ubuntu 22.04 LTS (GNU/Linux 5.15.0-40-generic x86_64)

...

Last login: Thu Nov 17 07:50:11 UTC 2022 from 192.168.0.1 on pts/0
root@ubuntu:~#
To exit the serial console, press CTRL+], then type quit:
root@ubuntu:~#
telnet> quit
Connection closed.
root@adf6e0bf4e6e:/app#
(Even) More Implementation Details
The architecture of the system can be summarized in the following diagram:

The os-cloud container is the core of the entire system. It consists of a web application written in python using flask. This web application exposes a virtual machine API that the user can interact with (like vm_create).
So, when we’re calling curl like in the example above:
curl -H "Content-Type: application/json" \
 -d '{ "name": "my_vm", "image": "ubuntu_22.04", "network": "default", "mem_size": "2G", "disk_size": "10G"}' \
 localhost:5000/vm_create
It will do an HTTP POST request (because of the -d parameter) to /vm_create. The request will be handled by the `